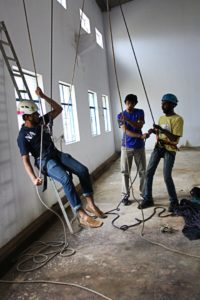
With big names such as Chris Martin, Justin Bieber and Ed Sheeran making their way to India, the pomp and show associated with live concerts is fresh in the minds of many people. One of the most important roles among the crew to ensure that a concert goes on smoothly is that of the rigger. Live rigging for concerts and live shows takes various elements, both strategic and technological, into consideration.
A rigger for live shows safely establishes power supplies for sound equipment, sets up basic backline, as well as monitoring and sound systems and knows how to operate them. Since the responsibilities that come with the role include handling equipment worth a small fortune, the rigger also is well versed with safety procedures for handling, rigging and staging and is able to function in a team alongside musicians and other performers. As someone who is familiar with the management and organisational roles involved with concert production, the rigger is extremely mindful of safe practices and essential health and safety for a smooth concert.
THE BASICS
Safe Working Loads
There are specific terms that are associated with rigging and these acronyms are a common sight on stands as well as rigging equipment. Common among them— WLL (Working Load Limit), SWL (Safe Working Load), or MRL (Maximum Rated Load)— indicate the same thing, namely, the maximum amount of static weight that the item will safely hold continuously, when it is used correctly as intended. A good rigger will know that a static load implies that the load such as a loudspeaker does not move at all, even because of the wind or while lowering or raising it. Safe working load limits should never be exceeded.
Safety Factors
Safety Factor, refers to the margin of safety added to an item that takes into account loadings over and above the weight being hoisted and for reductions in capacity due to the extra loads imposed by acceleration and inertia- namely, any kind of movement.
System Design
The parameters for system design and its use for concerts depends on the nature of the performance, the size, shape and nature of the performance venue, the expected audience and the required level of sound. System design plays a large part in the rating of individual components. Similar to a chain a chain, a rigging system is only as strong as its weakest link. It is all of these factors in combination that need to be taken into account by a qualified person to design the rigging system.
RIGGING METHODS
Since the topic of rigging is a vast one, here is a snapshot of the process in which some of the ways in which loudspeakers can be deployed and positioned is described.
Placement of the system
-
Put heavy equipment into its final location: Avoid handling equipment more than once by placing it into its final location when moving it from storage or the equipment van. This saves valuable set-up time.
-
Stands, leads, multicore in front of stage or in wings.
-
Ideal mixing position is two thirds down the room from the stage, clear of walls.
-
When setting up, appropriate lifting techniques (using hips and knees to squat down and lift) or injuries can occur.
Power the System
-
Locate circuit box and identify audio phase(s)
-
Run heavy duty power cable to amp rack and distribute power from there.
-
Run an extension cable from amp rack to FOH(front of house) mixer alongside the multicore.
-
Connect all AC power to equipment.
-
Don’t turn on equipment yet.
-
Run stage power according to stage plot.
Connect System Audio
-
Start to plug in audio connections in signal flow order. Eg. multicore, effects, drive-train, speakers, etc.
-
Secure and separate cabling.
-
Gaffer tape exposed leads at 1m intervals.
-
where power enter stage cover leads with carpet/plastic bridge/etc, so leads don’t get broken.
-
keep audio cables away from power and lighting cable if possible. (if you cant cross at 90 degrees)
-
Power up sound system in reverse signal flow order. (amps last!)
-
Run signal from CD to the speakers at very low level, check that the proper signal reaches the proper drivers. (unmute crossovers bands from hi to low.)
-
Turn up amps to full!
Connect Stage Audio
-
Produce channel allocations list.
-
Place stands and mics/DI’s.
-
Run and secure leads, keep excess cable under stand.
-
If cables are not numbered at both ends label them now. (you can use coloured tape for this.)
-
Label mics.
-
Optimize placement of mics, monitors and back-line on stage for minimization of spill, feedback and stage bleed.
Tuning the System
-
Tuning the crossovers, use a CD you are familiar with and match x-over frequency by ear.
-
Use narrow band noise source and measure drivers response.
-
Most systems will not require you to tune the x-overs as they use preset controllers.
-
Tune the system to the room.
-
Using the CD you are familiar with, adjust sliders on graphic EQ until it sounds right.
-
Using a microphone (check-one-two method), adjust for a natural vocal sound.
-
Use the ring method. Using the graphic EQ boost each frequency band until you get feedback.
-
Apply the RTA (real time analyzer) if you have one.
-
Apply Feedback Destroyer, again if you have one.
Sound Check
-
Plug in talkback mic if not already done so.
-
Adjust input gain (leave some headroom). Monitor sends first then some of the EQ.
-
Go through instruments sequentially making sure to leave the previous channels open.
-
Jot down settings if there is more than one artist.
Operating During Show
-
Look out for monitor requests.
-
Gain ride faders when necessary.
-
Be creative.
-
Strive to improve the sound.
-
Watch the gain settings.
Pack Down
-
Make sure band has finished.
-
Mute all channels
-
Secure mixer
-
Pack down stage, mics first.
-
Pack down system in reverse order.
After that, the rigging is mostly done. Audio Academy, has in its curriculum a module devoted to rigging, to ensure that their students are well versed with its basic principles and are good to rig a system when they graduate.
In conclusion, a competent rigger should inspect all rigging equipment and hardware before use and regularly inspect the equipment for signs of wear, abuse and general adequacy, as well as perform any manufacturer recommended preventive maintenance.
Do not ever cut corners when it comes to rigging. Manufacturers generally have cabinets designed by them which can be used while flying with the equipment, and remember to use only hardware approved for that specific model. Follow all manufacturer recommendations concerning their individual products and don’t ever modify any rigging hardware as it may affect the weight loading capacity of the item.
On a final note, factor in enough time to do rigging correctly and make sure the crew isn’t tired because it is rushing and fatigue that most often cause accidents. Double check everything before it goes up in the air.

Information about live sound engineering